

Printing on clothes and t-shirts has never been easier or more accessible. Technology has improved garment printing so much so that even home crafters can print photo-quality images on their clothing at home. Even so, if you are wondering how to print on t-shirts, there is a lot to learn about the different types of shirt printing methods before you start cranking out designs.
One of the great things about clothing printing is how easily it is to spruce up a cloth handbag or add a fresh look to a plain t-shirt. Not only is it very affordable for the DIY’er, but more people than ever are able to start at-home t-shirt printing businesses with minimal upstart cost.
All the talk of how accessible and easy it is, it can be overshadowed by how intimidating it is knowing which method you should use and which produces the best results. Don’t fret because we will explain everything you need to know. Once you learn how to print on garments with each method it will aid in deciding which method you may choose.
By the end of the guide, you should easily be able to determine which type of clothing printing you should use and whether it is suitable for home and/or professionals!
Types of T-Shirt Printing
Before you start printing t-shirts at home or commercially you need to decide which type of printing method you will use. If your intent is to begin a t-shirt printing business you will also need to decide which equipment you should invest in to start as it would take a large amount of money to purchase equipment for every printing type.
One of the most important things in determining which method is best for you is both the type of garment and the fabric it is made of. The reason being is depending on the garment’s geometry may limit the application method, for instance, transfer printing usually requires a heat press machine and without special attachments requires the garment to lay flat. Different fabric types may require special inks for best results and may not even be compatible with some printing types at all.
Whether you plan to print at home as a hobby or have professional t-shirt printing aspirations, you may also consider the printing methods capacity and whether you will have the ability to do high volumes of printing with a given t-shirt printing type. Among other things, below is another short list of attributes to keep in mind when evaluating methods.
Other Considerations:
- Durability of Print
- Feel of Print (soft vs stiff)
- Light & Wash Fastness (ability to resist fading)
- Ability to Print Wide Color Gradient
Let’s jump into the many different options you have to consider.
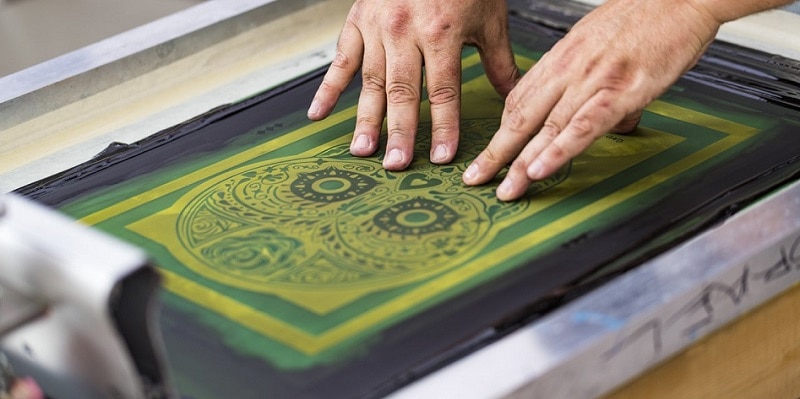
Screen Printing
Often considered the industry standard, this printing method involves pushing screen printing ink or textile paint one color at a time through a mesh or cutout stencil, which holds the design, onto your desired substrate. The designs need to be created in a program like Adobe Illustrator or Corel Draw because you need to be able to create the designs in layers with each color being a new layer due to the screen printing process.
Screen printing is by far one of the most popular types of t-shirt printing and is also used to print on many other surfaces including posters, signage, and more. It is also known as silkscreen, serigraphy, and serigraph printing. Although there are certainly small manual screen printing setups one can use at home, it is most commonly used by professionals operating high volume print shops.
This printing method is so popular because of its ability to do high volumes of printing very efficiently. It’s the best option for high volume printing because once you are setup up you can print shirts rapidly. That said, depending on the design and number of colors, the setup can be quite complex as every color in the design will need its own screen which is stenciled for that specific color. It also doesn’t handle color gradients as well as some of the other methods but they are constantly improving.
Screen Printing Steps:
- Create Your Design When creating your design, keep in mind the limitations of screen printing. Designs with too many colors will create additional challenges when creating manual screen prints, for instance, making sure all of the colors are perfectly aligned when they are applied. This isn’t an issue for automatic screen printing machines. Also, remember to create your design in color layers.
- Create Screens/Stencils
- Create Print On T-Shirt
Using your designs, you need to create a stencil for each color you intend to apply. This process is important and care should be taken to create accurate stencils.
With all of your stencils created, you can now begin the process of laying down layers of screen printing ink one at a time by aligning the stencils onto the garment and evenly distributing the ink across the stencil.
Each layer must dry before moving on to the next color and can be flash dried to save time. You also need to make sure you determine the order of your screens if any of the colors overlap. Once you have Printed each layer and they have dried you can now set the ink with heat.
Following these general steps while also considering the ink manufacturer’s instructions you should end up with a great looking t-shirt or other garments!
Screen Printing Pros & Cons
- Superior Quality and Durability
- Prints Are Soft Feeling
- Speedy & Efficienct Printing High Volumes
- Complex Process
- Not Best for Small Runs with Complex Designs
- Pricey To Get Setup with Screen Printers

Transfer Printing
Transfer printing is a method of t-shirt printing in which the design is first transferred to a specific type of paper (depending on the specific type of transfer method), and then transferred to the garment usually using a heat source like a heat press machine or a clothes iron.
This method of garment printing is very economical and efficient. For that reason, it is one of the best options for anyone wanting to print t-shirts at home. Virtually anyone with a printer can begin creating heat transfers and print designs to transfer to t-shirts. Other benefits are quicker production times for low volume runs, simple techniques even with complex designs with certain methods, and the reject rate is low.
You can also create a variety of effects and textures like fluorescents, metallics, and velvets. Finally, transfers can be done on just about any fabric type which isn’t always the case with DTG and screen printing. Let’s get into the many specific transfer printing methods.
Plastisol Transfers
Plastisol transfers are essentially screen prints applied directly to a special type of paper using special plastisol inks and other additives like special adhesives. This produces one of the best quality prints of the transfer methods in both color vibrancy and feel.
Plastisol has the same limitations of screen printing consider the transfers are screened onto paper. This means gradients and multicolor limitations exist with this method. That said, the benefits aside from quality are that you don’t have to transfer your prints immediately and can have stock of plastisol paper transfers ready to be heat transferred on a desired shirt or garment on demand.
If you do not already have a screen printing setup you can usually purchase plastisol transfers from any shop setup to do screen printing. This is great if you want to provide your own clothing or want to transfer design when the demand is there.
Plastisol Steps (Indirect Screen Printing):
- Create Your Design Since Plastisol is essentially a screen printed transfer you will create your designs much the same way which is color, layer by color layer. The only difference is when your designs are complete you need to flip them or mirror the design. The reason is the designs are first going onto transfer paper and then the shirt or other garments.
- Create Transfer
- Transfer Design To Shirt
Just as with screen printing you will basically print your design color by color onto the transfer paper. The only difference is you will begin with the outer colors first, flash curing the plastisol ink before moving on to the next color.
You will usually finish your prints with one or two base layers which aid in the opacity of the designs. For darker t-shirts, you will usually need two base layers of white or light-colored ink and one for light-colored shirts. This will help the colors stand out.
Plastisol transfer sheets are pretty much like any other heat transfer. Sheets can be stored away until ready to be transferred. When you are ready to transfer your design onto the garment, pre-heat your heat press to the ink manufacturers recommended temperature setting, align your design and press the heat plate down onto the design for the time and pressure recommended by the ink manufacturer.
You should end up with a great looking and feeling plastisol print by following these general steps!
Plastisol Pros & Cons
- Soft Feel and Durable
- Create Yourself or Order from Screen Printer
- Immediate Transfer Not Necassary
- Creating Transfers is Complex
- Best For High Volume
- Direct Screen Printing is Slightly Better
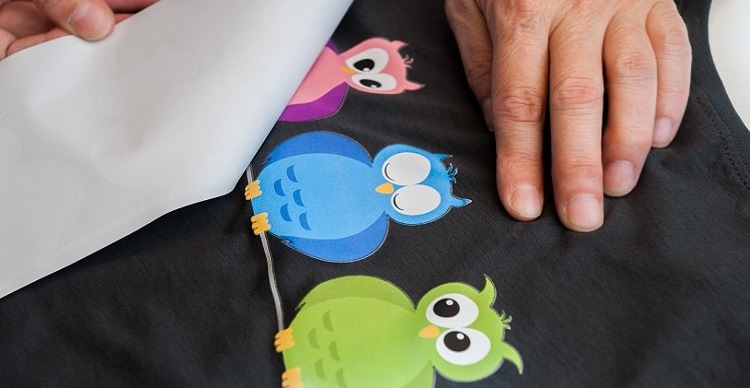
Heat Transfer Paper
Heat transfer printing is one of the most accessible forms of t-shirt printing. Virtually anyone with a laserjet or inkjet printer can print high-quality images on a special heat transfer paper to be heat pressed onto fabric. Transfer paper used to yield low-quality prints that weren’t very durable and weren’t as visually appealing but technology has improved a ton in regards to both printers and transfer paper.
This method is very popular among anyone wanting to make shirt prints at home but it is also used by professionals as well in certain circumstances. This method can print colorful complex images that easily that is cost-effective and requires little to no special setup. The feel of heat transfer prints is not as soft as other t-shirt printing methods.
There are a few things to consider when making prints using heat transfer paper. It is important to note that the results will not be as vibrant as other methods when transferring to dark fabrics and you need to be sure to use opaque transfer paper. Lastly, you need to trim any excess paper from your printed design, otherwise, you will transfer unnecessary material onto the shirt which is noticeable in looks and feel. This can be done by hand or with a vinyl cutter/plotter.
Heat Transfer Paper Steps:
- Create Your Design Just as any other method, you will want to create your design in a graphics program. You will not really need to take the same measures of creating your designs using color layers like with screen printing. You can also use just about any type of image that you would normally print.
- Print Design On Transfer Paper
- Heat Press
With your newly created design, refer to the paper manufacturers instructions to make sure you follow the proper printing procedure but in general you print like any other print but with the image mirrored so it looks correct when transferred to the garment.
After you have printed your design, trim away any excess paper as close to your design as possible, unless you have printed on a laserjet printer using Image Clip Paper.
At this point you will want to refer to the paper manufacturer’s instructions for transferring the print. They will give you the ideal temperature settings and amount of time you will need to apply the heat. With your design ready to be transferred to the pre-shrunk t-shirt or other fabric you should position the print where you want it and apply the heat and pressure for the specified time.
Following these general steps while also considering the paper manufacturer’s instructions you should end up with a great looking t-shirt or other garments!
Heat Transfer Paper Pros & Cons
- Affordable and Accessible
- Print Small Runs Economically
- High Image & Color Quality
- Print Feel is Not as Soft
- Not as Durable
- Works Best with Light Colored Fabrics

Sublimation Transfers
Sublimation transfers are made using special sublimation ink. In a lot of ways the steps are exactly like heat transfer paper printing but unlike heat transfers, dye-sub transfers can only be transferred on to polyester and other manmade fabrics and will not work on cotton. It is also most popular with transferring to hard goods like mugs rather than t-shirts.
The sublimation ink is unique in that it starts as a solid but when heated the ink partially liquifies and when this process is combined with pressure and applied to the fabric it bonds with the fabric. This results in a highly durable and often times vivid print on light-colored fabrics.
The limitations of dye sublimation printing aside, this type of t-shirt printing work really well on light-colored fabrics that are made of polyester. The process is self-weeding so you won’t have to worry about trimming away excess material that does not contain ink. The process can also be done at home using sublimation inks in your compatible home printer and sublimation printer but it is also done by professionals who are capable of making transfers that cover an entire shirt.
Sublimation Printing Steps:
- Create Your Design Just as any other method, you will want to create your design in a graphics program. You can also use just about any type of image that you would normally print.
- Print Design On Transfer Paper
- Heat Press
With your newly created design, refer to the paper manufacturers instructions to make sure you follow the proper printing procedure but in general you print like any other print but with the image mirrored so it looks correct when transferred to the garment.
At this point you will want to refer to the paper manufacturer’s instructions for transferring the print. They will give you the ideal temperature settings and amount of time you will need to apply the heat. With your design ready to be transferred to the t-shirt or other fabric you should position the print where you want it and apply the heat and pressure for the specified time.
Following these general steps while also considering the ink manufacturer’s instructions you should end up with a great looking t-shirt or other garments!
Sublimation Printing Pros & Cons
- Image Quality and Feel
- Self Weeding
- Durable
- Sublimation Ink can be Expensive
- Transfers on Light Fabric Only
- Can only be used on Polyester
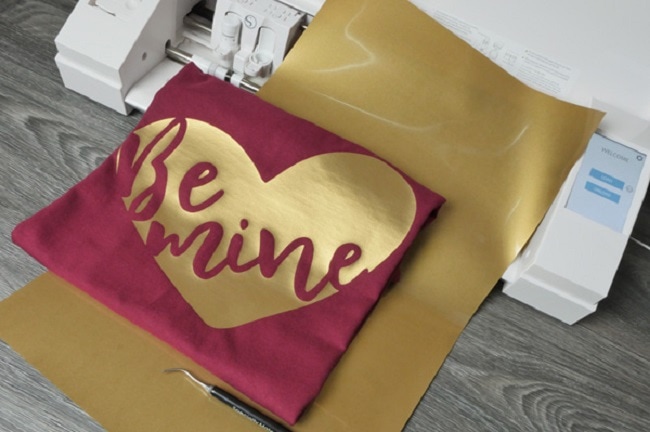
Vinyl Transfers
Vinyl Transfers are a very popular transfer method for sports apparel and simple mono-colored graphics. Vinyl transfers of numbers, letters, words, and smaller logos can be created quickly and economically using a vinyl cutting machine. A vinyl cutting machine is essentially a plotter that cuts designs made in a graphics program like Adobe Illustrator into vinyl that is sold in rolls.
The simplicity of the vinyl transfer methods makes it a viable option for small runs or even large runs. While mono-colored designs are most common, it is still possible to create multicolored designs utilizing different vinyl colors and transferring them one color at a time assembling the design one color at a time. It is best to stick with simpler designs using this methods
Vinyl Transfers Steps:
- Create Your Design When creating your designs your graphics will end up being created much in the same process as screen printing where you are creating the designs in layers by color. You can either create the design in which you layer or overlap your colors but keep in mind the more you overlap colors the stiffer the feel of the design will be.
- Cut The Vinyl
- Heat Press
When you have created your design, import it to the software program that came with your vinyl cutter to prepare for cutting the vinyl. Begin cutting the design for each color and set them aside, you can also assemble the design to track your progress.
When you have a complete design cut out of all the vinyl pieces you can position them on the fabric to prepare to heat press. Pre-Heat the heat press to the recommended temperature and proceed to press the plate onto the vinyl to adhere it to the fabric.
Following these general steps while also considering the vinyl manufacturer’s instructions you should end up with a great looking t-shirt or other garments!
Vinyl Transfers Pros & Cons
- Very Durable
- Cost Effective Method
- Viable on Nearly Every Fabric Type
- Stiff Feel
- Need to be Familiar with special software and vinyl cutter
- Not Good for Complex Designs
Stretch Litho Transfers
Litho transfers are one of the newer methods of t-shirt printing technology. It seemingly combines digital printing with screen printing, and the name litho refers to lithography as it works much the same way. It prints to a flat surface meant to repel the ink.
Litho transfers maintain the details of the image/design better than other printing techniques because it is printed on paper first. Paper is a smoother substrate than fabric which means the dot of color doesn’t expand as much when it touches the surface.
This method is fairly new and requires special printers and ink to create the actual transfer. This makes this method cost prohibitive for anyone wishing to make litho prints at home. That said, you can order litho transfers from companies that offer it to be transferred at a later time, much like plastisol transfers. Order minimums are usually fairly high.
Stretch Litho Steps:
Since this method is limited to professionals with access to the proper equipment the below steps are a general outline.
- Create Your Design
- Print Your Stretch Litho Transfer
- Heat Press the Litho Transfer
Stretch Litho Pros & Cons
- High Quality and Detail
- Great Feel
- Limited Availability
- Large Order Minimum
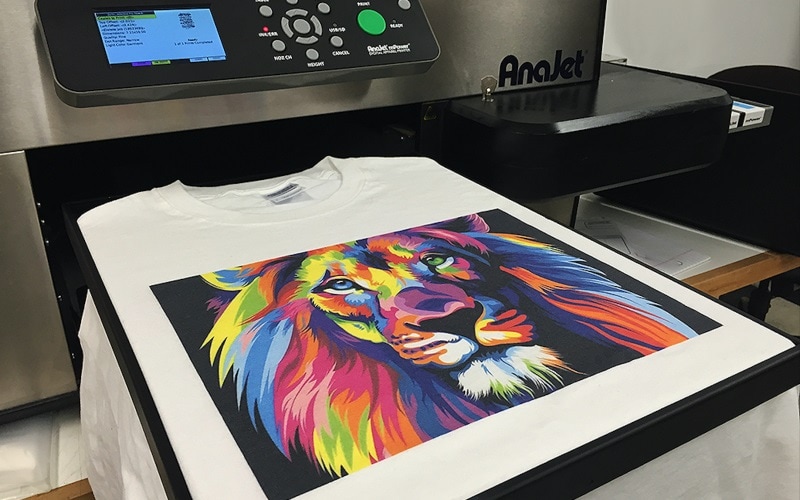
Direct To Garment (DTG) Printing
Of all of the t-shirt printing methods out, DTG is the newest method and one of the most straight forward at that. This method of t-shirt printing works like any other paper printing method. You simply position the garment in the printer and it prints directly onto the garment using water-based inks. Note because of the use of water-based inks it will not usually print on synthetic fabrics.
Given how approachable and straight forward DTG printing is, it is very appealing to beginners but it very expensive to get set up with a Direct-To-Garment printer, usually around $10k to start. This is why it usually reserved for businesses that can afford the expense.
DTG is utilized best on images considered too complex for other methods like when you need to print over the entire garment or when you need to reproduce color gradients and other small details other methods can not. The method of using ink printed directly onto the fabric creates very soft prints but the downside is it will only give you the best results on very light fabric colors. Print times can also be fairly long.
Direct To Garment Steps:
- Create Your Image You can either create your own original image or start with an existing image. The options are virtually endless and restrictions are limitless.
- Print on the T-Shirt
With your image ready to print, you simply place the washed and preshrunk garment correctly into the printer and set it to print.
Following these general steps while also considering the printer manufacturer’s instructions you should end up with a great looking t-shirt!
Direct To Garment Pros & Cons
- High Image Quality
- Soft Feel
- Great for Print-On-Demand
- Colors Fade Over Time
- Not Great For High Volume
- Not For Synthetic Fabrics Like Polyester
What is the Best T-Shirt Printing Method
Now that you know how to print on t-shirts and are thoroughly familiar with all of the different t-shirt methods you should be better equipped to determine which method or methods are best for your needs. The best way to determine this is by asking yourself a few questions and determining the appropriate method.
- Do I need to print in bulk?
- Will the design be complex and colorful?
- Do I own the equipment necassary to create t-shirt prints?
Once you decide on your method and whether you are capable of handling the printing process or if it is best left to a professional you can get started with your t-shirt printing adventure!


